
There’s something special about cold days when kids stay near the windows, watching frost patterns form like tiny drawings in the air. They often imagine winter fairies tiptoeing across the glass, creating those icy marks. That small spark of imagination inspired this Winter DIY project—an easy, magical craft where printed ice crystals become the centrepiece of a whimsical fairy garden.
This activity blends creativity, sensory play, storytelling, and hands-on crafting. Kids get to cut, arrange, decorate, and design a tiny winter world, while adults enjoy a calm, screen-free project that brings the season’s charm indoors. Whether you’re preparing a weekend craft, a classroom project, or a simple snowy-day activity, this printed ice crystals fairy garden offers a beautiful and engaging way to enjoy winter.
What You Need to Get Started
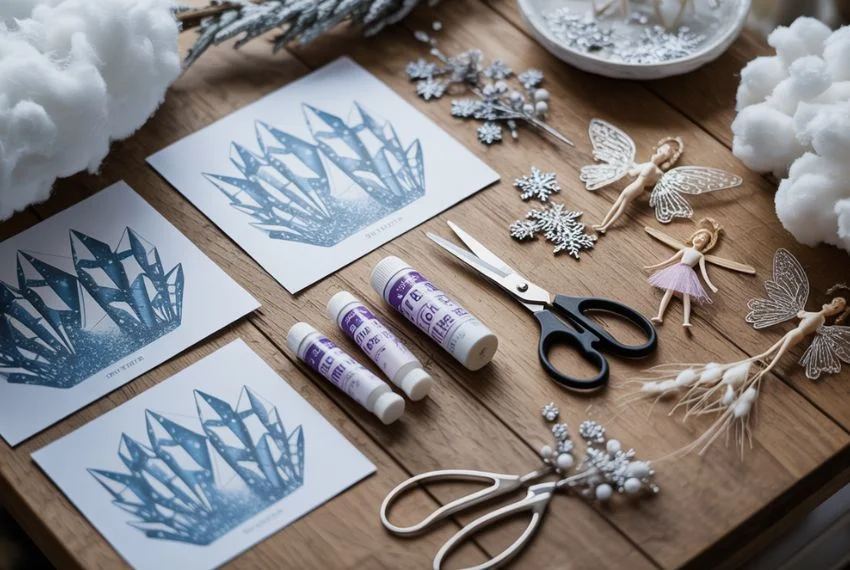
- Printable ice crystal sheets
- White or pastel cardstock
- Scissors (child-safe if needed)
- Glitter glue or iridescent markers
- Mini fairy garden figurines
- Battery-operated fairy lights
- Cotton, salt, or artificial snow
- A shallow tray, bowl, or mini planter
- Small natural items (pinecones, twigs, small stones)
This craft is perfect for kids and adults of all ages because the steps are simple, the materials are affordable, and the final result looks stunning on any winter-themed shelf or tablescape.
Step-by-Step Guide to Making Your Fairy Garden
1. Print and Prepare Your Ice Crystals
Start by printing ice crystal designs on cardstock so they stay sturdy while standing upright. You can use blue-toned, snowflake-style, or crystal-shape templates.
This is where the magic begins, and it’s one of the most relaxing parts of the Winter DIY process.
2. Cut Out the Crystals
Cut each crystal carefully, making sure the edges remain sharp and clean. If kids are doing this part, let them trim the simpler shapes while you handle the more intricate ones.
For a longer-lasting garden, consider laminating the finished crystals.
3. Add Sparkle and Winter Details
Use glitter glue, white gel pens, or shimmery markers to enhance the printed designs. A little sparkle makes the fairy world feel alive—especially when lights hit it in the evening.
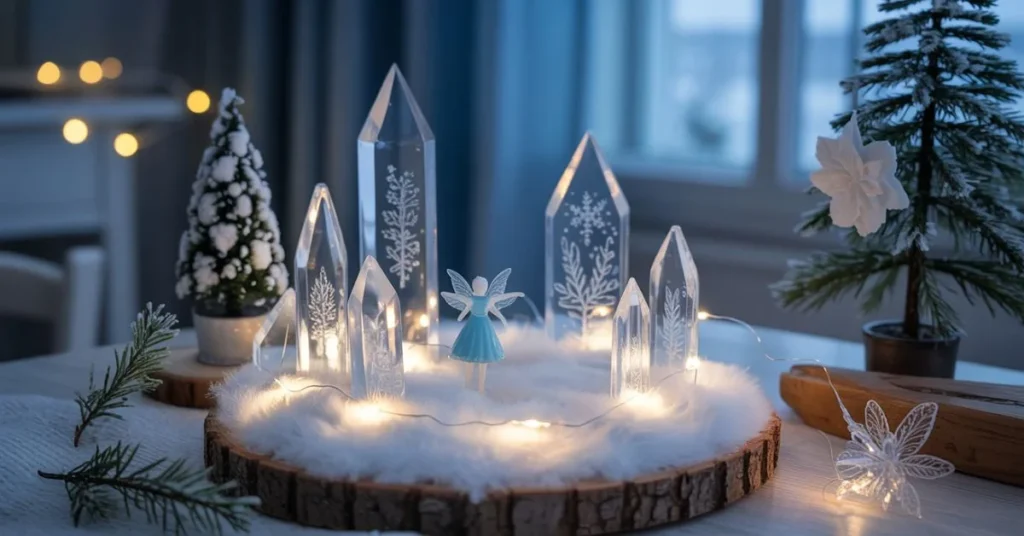
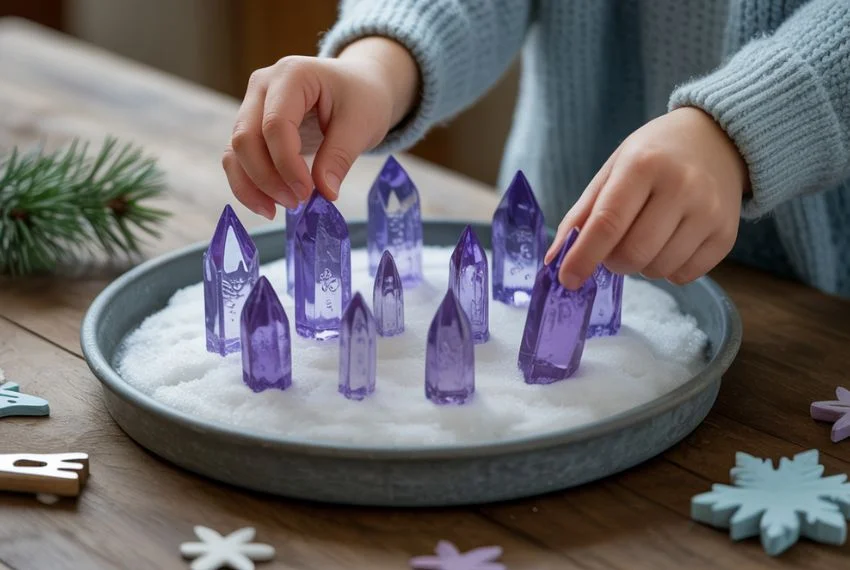
4. Build the Fairy Garden Base
Choose a shallow tray, bowl, or planter as the foundation of your fairy scene. Spread cotton or artificial snow across the base.
This is where the project becomes a sensory-rich Winter DIY activity, as kids love fluffing and shaping the “snow.”
5. Arrange the Printed Ice Crystals
Place your crystals upright by attaching them to wooden craft sticks or taping a small support at the back.
Create layers—taller crystals at the back, medium in the middle, and smaller ones up front.
6. Add Fairy Accessories
Bring the garden to life with:
- Mini fairy figurines
- Small pine trees
- Pebble paths
- Tiny fairy houses
These details make the scene feel immersive and encourage imaginative storytelling.
7. Light Up the Fairy Garden
Battery fairy lights add warmth that balances the icy theme. Wrap them around crystals or place them under the cotton “snow” for a glowing winter ambiance.
Why This Project Is Perfect for Kids and Adults
This Winter DIY craft has a wonderful mix of creativity, imagination, and fine motor skill development. Kids practice cutting, designing, arranging, and storytelling. Adults enjoy the calming, artistic side of building something beautiful by hand.
The printed crystal concept keeps the garden easy, inexpensive, and mess-free. It’s also repeatable, kids can add new designs every week.
Creative Variations You Can Try
1. Watercolour Ice Crystal Garden
Print blank crystal outlines and let kids paint them with watercolours before adding glitter. This version becomes a more artistic Winter DIY craft.
2. Outdoor Frozen Crystal Garden
If temperatures drop, place your garden outside and add real frozen items like ice gems, frozen leaves, or icicles.
3. Story-Themed Fairy Garden
Have kids create short fairy stories and design crystals according to their characters.
This encourages writing, creativity, and imaginative play.
4. Tabletop Winter Village
Mix fairy garden elements with mini winter village houses for a festive display.
Tips for Displaying Your Fairy Garden
- Place it by a window where morning sunlight makes the crystals glow
- Use it as a winter centrepiece for holiday gatherings
- Add essential oil drops (peppermint or pine) for a seasonal aroma
- Set up a rotating platform for a magical 360° fairy scene
This project doesn’t just sit on a shelf—it becomes part of your home’s winter atmosphere, giving your décor a handmade, charming touch.
Safety Notes for Kids
This Winter DIY activity is generally safe, but keep in mind:
- Supervise cutting
- Use non-toxic paints and glues
- Keep fairy lights battery pack secured
- Avoid small parts around toddlers
Final Thoughts
Creating a fairy garden with printed ice crystals is a calming, magical project that blends winter charm with hands-on creativity. It’s budget-friendly, kid-friendly, and perfect for cozy afternoons indoors. This Winter DIY craft adds sparkle to the season and invites kids (and adults!) to step into a whimsical, miniature world filled with imagination.
Whether it’s set on a shelf, placed near a window, or used as a holiday decorative piece, this fairy garden becomes a little winter story of its own—one that continues to grow with each new crystal you print and place.
Also Check Fun and Functional Mud Kitchen Ideas.

FAQs
1. Can I use real ice or snow in this project?
Yes, but only if the garden is displayed outside or in a cold area. Real snow melts indoors.
2. How long do printed ice crystals last?
Cardstock prints last a long time indoors. Laminating makes them reusable every winter.
3. Are there alternatives to cotton snow?
You can use salt, baking soda, felt sheets, shredded paper, or artificial snow powder.
4. Can this be a classroom activity?
Absolutely! It’s simple, low-cost, and perfect for winter craft stations.
5. How often should I replace decorations?
Whenever kids want to change scenes. That’s the fun of this Winter DIY craft—it evolves with imagination.