

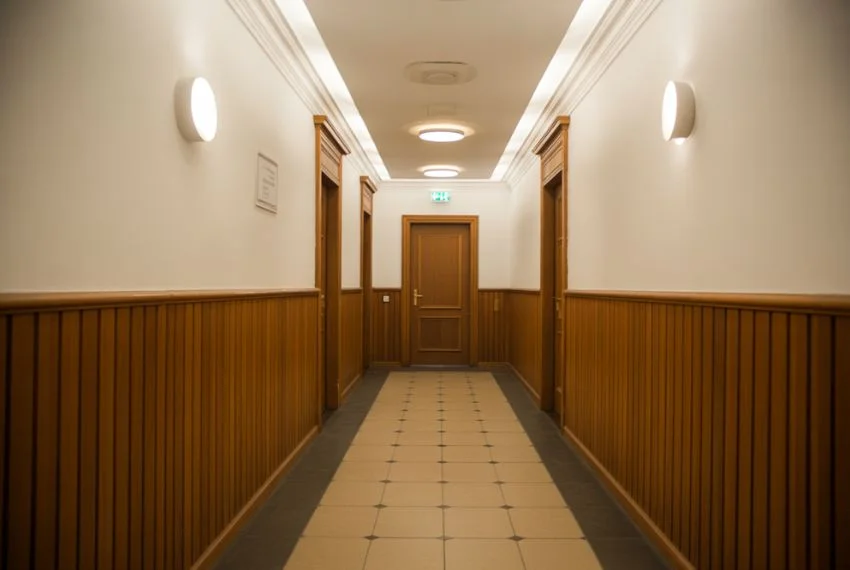
You can give your hallway instant style and structure without a big remodel. Hallway panelling adds depth, hides scuffs, and creates a clear design direction for the rest of your home.
Choose the right style, material, and finish and you can turn a narrow or bland corridor into a striking, usable space that suits your home and budget.
This post walks you through practical benefits, popular looks, material choices, color and finish ideas, ways to add storage or hooks, and whether to DIY or hire a pro. Use these ideas to pick a panelling plan that fits your space and skill level.
Benefits of Hallway Panelling
Hallway panelling can change how your entry feels, add tough protection where walls get scuffed, and hide dings or uneven surfaces. It gives you options for color, texture, and finish that suit the rest of your home and your daily needs.
Aesthetic Transformation
Panelling adds instant structure and style. You can choose vertical slats to make a short hallway look taller or horizontal boards to widen a narrow corridor. Paint the panels a deep colour for drama or keep them natural for warmth and grain that reads like furniture.
Mixing profiles and heights creates visual layers. For example, a 36-inch dado rail with raised panels below and smooth paint above gives a classic look. Or use shaker-style MDF for a clean, modern feel. Lighting and picture rails work well with panelling to highlight artwork or portraits.
Think about finish and scale. High-gloss paint reflects light in tight halls. Matte paint hides fingerprints better. Thin battens suit compact spaces; wide tongue-and-groove suits longer runs. These choices directly affect how your hallway reads and how it connects to nearby rooms.
Durability and Protection
Hallways take a lot of wear from shoes, bags, and moving items. Solid wood, MDF, or engineered panels provide a hard surface that resists dents and scrapes far better than plain drywall. You can choose impact-resistant profiles in high-traffic zones like near doors or stairs.
A durable paint or clear varnish adds another defense layer. Water-based satin paints clean easily and resist staining. For homes with kids or pets, consider durable PVC or melamine panels that wipe clean and won’t swell with moisture.
Installation details matter. Fix panels to studs or use adhesive and screws in a regular pattern to prevent flex and gaps. When properly installed, panelling reduces repair frequency and preserves the underlying wall, saving time and money over years of use.
Concealing Imperfections
Panelling hides uneven plaster, hairline cracks, and patchy textures without major wall rebuilding. By installing a uniform surface, you avoid costly skim-coating or re-plastering. Panels also mask differences where old paint meets new or where trims don’t align.
You can plan seams and joints to coincide with problem areas. Taller panels cover higher faults; beadboard is helpful for irregular lower walls. Use trim or moulding at the top edge to create a neat finish and prevent the eye from tracking small flaws.
If wiring or plumbing runs near the surface, panelling offers a tidy way to conceal them. You can route cables behind a removable panel section for future access, keeping the hallway looking clean while allowing practical maintenance.
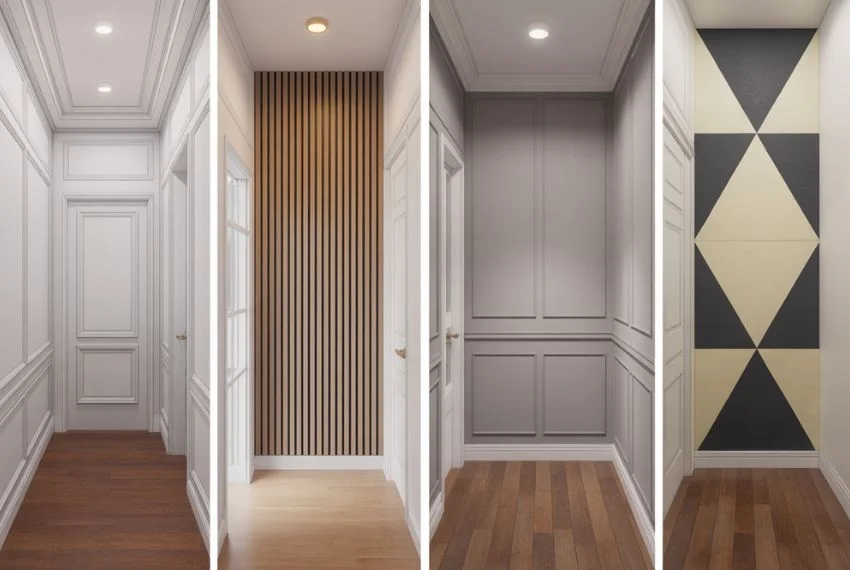
Popular Hallway Panelling Styles
These styles focus on shaping light, protecting walls, and adding character. Each option shows different levels of detail, cost, and upkeep so you can pick one that fits your space and budget.
Traditional Wainscoting
Wainscoting uses solid panels or raised boards on the lower third of the wall. You often see a chair rail on top and baseboard below, which protects against scuffs in high-traffic halls.
Choose materials like MDF or hardwood for durability. Paint the panels in a semi-gloss finish for easy cleaning or stain hardwood to show grain and warmth. Installation requires level measurement and secure fixing to studs or battens.
This style works well with classic or period homes, but you can paint it a bold color for a modern twist. Expect moderate cost and a longer install time compared with flat paint.
Modern Vertical Slats
Vertical slats create rhythm and height, guiding the eye along the corridor. Slats come in wood, MDF, or metal and can be spaced tightly for a continuous look or set apart for a lighter feel.
You can run slats from floor to ceiling or just partway, and you can add backlighting behind gaps for a dramatic effect. Finish options include natural wood tones, painted colors, or lacquer for a sleek look.
This style is low to moderate maintenance and suits minimalist, Scandinavian, or contemporary interiors. Cutting and aligning slats carefully keeps joints neat and reduces shadow inconsistencies.
Shaker-Style Panelling
Shaker panelling features flat recessed panels with simple, square frames. The clean lines give a neat, understated look that works across traditional and modern spaces.
Use solid wood or painted MDF depending on budget. White or neutral tones keep the hallway bright, while deeper colours add a tailored, cozy feel. Shaker panelling is easy to touch up when scratched or scuffed.
Installation is straightforward: assemble frames and panels, then secure to the wall. You get classic detail without ornate carving, so it fits rental homes and long-term houses alike.
Geometric Patterns
Geometric panelling uses squares, hexagons, or custom shapes to create a bold graphic effect. You can repeat a single motif, mix two shapes, or lay panels in a grid for strong visual impact.
Select shallow relief panels for subtle texture or deeper mouldings for a sculpted look. Paint colour choice changes the mood: monochrome keeps it calm, while contrasting colours add vibrancy.
This option often requires more precise cutting and planning. Use templates and spacers during install to keep pattern symmetry. Geometric panels work best on a feature wall or short hallway to avoid overwhelming the space.
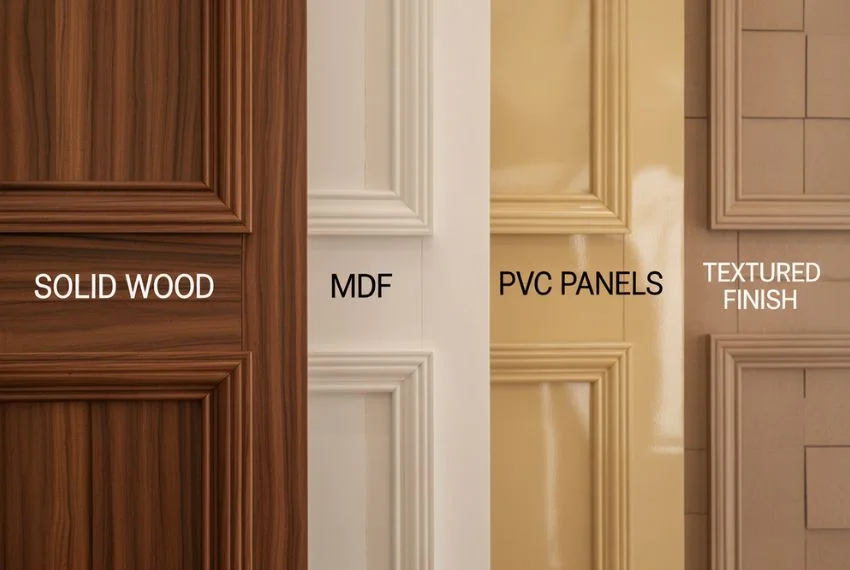
Choosing Materials for Hallway Panelling
Pick materials that match traffic, budget, and moisture levels. Think about durability where kids or pets run, finish options for your style, and whether the hallway needs easy cleaning or moisture protection.
Wood Panelling Options
Wood gives a warm, classic look and comes in solid hardwood, engineered wood, and reclaimed timber. Solid hardwood like oak or maple holds up well to dents and can be sanded and refinished, but it costs more and can expand with humidity. Engineered wood has a thinner hardwood layer over plywood; it resists movement better and costs less while keeping a real wood face.
Reclaimed wood adds texture and character but may need extra prep for pests or uneven boards. For a modern look, consider vertical slats or tongue-and-groove planks. Finish choices matter: oil brings out grain, lacquer adds sheen, and paint offers color with easier touch-ups.
MDF Alternatives
MDF panels and mouldings suit painted, budget-friendly installs. Standard MDF is smooth, easy to cut, and holds intricate profiles without knot issues. It paints evenly and gives crisp, modern lines for shaker or board-and-batten styles.
Note MDF swells with water, so use primed or moisture-resistant variants in areas prone to damp. Also pick furniture-grade or high-density (HDF) for higher traffic zones; they resist dents better than low-density MDF. Installation is straightforward: glue and nails on studs, then caulk seams and prime before painting for a long-lasting finish.
Moisture-Resistant Materials
If your hallway faces moisture from a nearby bathroom or basement entry, prioritize water-tolerant options. PVC panels resist rot and mold, never warp, and clean easily with soap and water. They work well up to chair-rail height or full wall cover in damp corridors.
Fiber cement boards offer high durability and a painted finish like timber without decay. Marine-grade plywood gives wood appearance with better water resistance than standard plywood. For mixed protection, combine a moisture barrier behind the paneling with treated baseboards and ventilated trim to reduce trapped humidity.
Color and Finish Ideas
Choose colors and finishes that match how much light your hallway gets, how much wear it sees, and the mood you want. Focus on practical choices that protect walls and make the space feel intentional.
Classic White and Neutrals
White and neutral tones keep narrow hallways bright and make small spaces feel larger. Use crisp white (pure white with cool undertones) on upper walls and trim to reflect light from windows or ceiling fixtures. Pair with a soft greige or warm taupe on lower panelling to add subtle contrast without closing the space.
Neutrals hide scuffs better than pure white when you pick a slightly darker shade for the lower half. Choose a semi-gloss or eggshell finish for panelling to make cleaning easier. If you want texture, go for a matte wall above the panelling and a glossier trim to emphasize the architectural detail.
Bold and Dark Hues
Dark colours add drama and depth but can shrink a hallway if used without care. Paint panelling in rich tones—navy, forest green, or charcoal—while keeping the upper walls and ceiling a lighter shade to preserve brightness. This creates a grounded look and highlights moulding and trim.
Use satin or semi-gloss finishes on dark panelling so light catches the profile and hides fingerprints. Consider two-tone treatment: dark panelling with a lighter dado or rail. Add bright hardware or wall lights to contrast the dark finish and avoid a heavy feel.
Painted vs. Stained Finishes
Painting gives you exact colour control and easier matching to trim, while staining shows wood grain and feels warmer. Choose paint when you want bold colour, crisp lines, or durable, washable surfaces. Opt for stain if your panelling is high-quality wood and you want natural texture.
Finish choice affects maintenance: painted panels in semi-gloss clean with a damp cloth; stained panels use clear varnish for protection. If you expect heavy traffic, select more durable topcoats (polyurethane or water-based lacquer). For a mixed approach, stain rails and paint panels to combine warmth with easy upkeep.
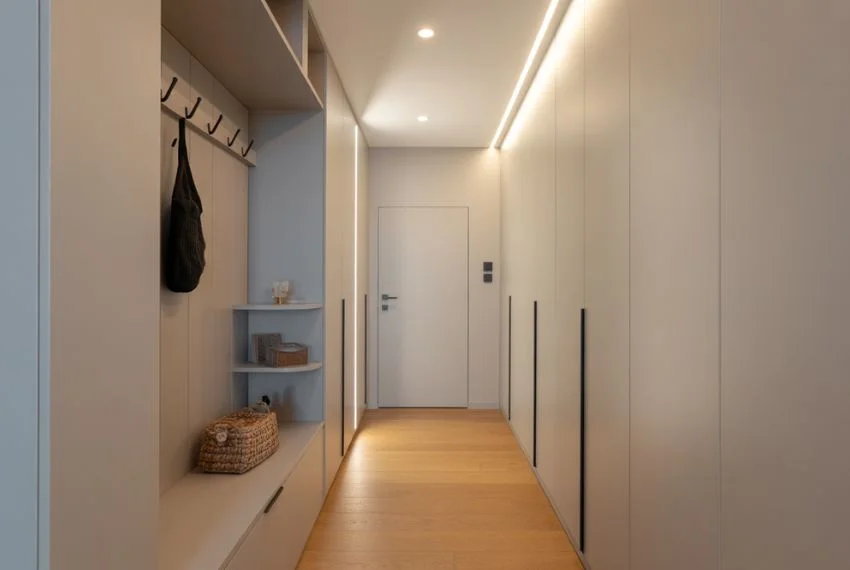
Adding Functionality to Hallway Panelling
Make the panelling work for daily life by adding smart storage, handy hooks and small shelves, plus lighting that improves safety and highlights your design. These changes protect walls, save space, and make routines faster.
Integrated Storage Solutions
Build storage into the panelling to keep items off the floor and out of sight. Consider full-height recessed cabinets behind flush panel doors for coats and tall boots, or lower bench units with lift-up lids to store shoes and sports gear. Keep the cabinet depth between 30–40 cm (12–16 in) in narrow halls so doors and circulation still work.
Use adjustable shelving inside to fit baskets, hats, or folded umbrellas. Add drawer units with soft-close runners for keys and gloves. If you prefer open storage, install cubbies at waist height so you can grab items without bending. Choose durable finishes like lacquer or oak veneer where scuffs are likely.
Hooks and Shelves
Place hooks and narrow ledges directly on the panelling for quick drop zones. Mount hooks at two heights: about 160 cm (63 in) for adult coats and 110 cm (43 in) for children or bags. Use metal or solid-wood hooks fixed into studs or with proper wall anchors to avoid sagging.
Add slim floating shelves (10–15 cm / 4–6 in deep) above the hooks for mail, sunglasses, and small trays. Label a single shelf as a “daily” shelf to reduce clutter. For a cleaner look, combine a row of recessed shelf niches with LED strips to store and show small items without protruding into the walkway.
Lighting Enhancements
Place lighting inside and around the panelling to improve safety and show off details. Use LED puck lights or strip lights inside recessed cabinets and under benches so you can see contents without opening everything. Install motion-sensor LED strips along the baseboard or inside toe-kick areas for night guidance without harsh overhead light.
For ambient and accent lighting, add wall washers or picture lights above panelled sections you want to highlight. Choose warm white LEDs (2700–3000 K) to keep skin tones and wood finishes looking natural. Run switches at the same height as your panelling controls, or use wireless dimmers and sensors for easy retrofits.
DIY vs. Professional Installation
Decide whether you want to save money and learn a skill, or pay for speed and guaranteed fit. Consider your tools, time, and how precise the panelling must be for stair runs, corners, and trims.
Project Planning Tips
Start by measuring the hallway walls, doors, and any stair angles. Write down wall heights and lengths, window and door trim widths, and any outlet or thermostat locations. This makes cutting panels and ordering mitres far easier.
If you DIY, choose simple profiles like tongue-and-groove or flat battens. Buy a level, stud finder, mitre saw, adhesive, and brad nailer. Practice cuts on scrap wood first to avoid wasting materials.
If you hire a pro, get at least three quotes with exact scope: removal of old trim, wall prep, number of coats of paint, and who supplies materials. Ask for a timeline, warranty, and examples of similar hallway jobs.
Plan for access and protection. Move furniture, protect floors with drop cloths, and tape off trim. For stair runs, plan scaffold or secure ladders and factor in extra labor for angled cuts.
Budget Considerations
List material costs first: panels, moulding, adhesive, nails, paint, and primer. Rough estimates: basic MDF planks cost less than solid wood; pre-primed panels save time and paint. Add 10–15% extra for waste and mistakes.
Factor in tool costs if you don’t own them. A decent mitre saw and brad nailer often pay off, but renting for a weekend can be cheaper than buying. Include consumables like sandpaper, caulk, and masking tape.
Compare DIY labour value to professional quotes. A pro will charge for measurement, prep, cutting, fitting, and finishing. Ask pros to break down labour vs. materials so you can choose which tasks to DIY to cut costs.
Remember hidden costs: fixing uneven walls, replacing rotten timber, or relocating electrical outlets raises price. Build a small contingency of 10–20% into your budget to cover surprises.
Caring for and Maintaining Hallway Panelling
Keep dust and spills low, check joints and paint for wear, and fix small damage before it spreads. Use basic tools and gentle cleaners to protect finishes and keep panels looking new.
Routine Cleaning
Use a soft microfiber cloth or a vacuum with a brush attachment to remove dust weekly. Start at the top of the wall and work down so loose dirt falls to the floor.
For painted panels, mix a few drops of mild dish soap with warm water. Dampen a cloth, wring it well, and wipe panels in sections. Dry each section with a clean cloth to avoid water marks.
For stained or raw wood, use a wood cleaner or a slightly damp cloth followed by a dry cloth. Avoid harsh chemicals, high-pressure sprays, and abrasive pads that can strip finishes or scratch surfaces.
Clean scuff marks with a melamine sponge gently; test in an unseen spot first. Pay special attention to high-traffic areas near doors and stairs.
Repair and Upkeep
Inspect panels monthly for loose trim, gaps, or lifting seams. Tighten screws or refasten molding with finish nails and wood glue where needed.
Fill small dents or nail holes with putty that matches your panel material. Sand lightly once dry and touch up paint or stain to blend repairs.
For warped or rotten sections, remove the damaged piece and replace it with a new matching panel. Measure and cut precisely, then seal edges with caulk and finish to match the surrounding panels.
Repaint or re-stain every few years in high-use hallways. Light sanding and a fresh coat restore protection and improve appearance without full replacement.

Final Thoughts
Panelling can change how your hallway feels without a huge overhaul. It adds texture, protects walls, and helps define your home’s style in a small but noticeable way.
Pick a style that matches your home and your needs. Simple tongue-and-groove or shiplap gives a cozy look. Vertical or fluted panels make the space feel taller. Two-tone or geometric designs add a modern touch.
Think about durability and maintenance when you choose materials. Painted MDF is budget-friendly and easy to keep clean. Solid wood adds warmth but may need more care. Consider moisture and traffic levels before you decide.
Use lighting and trim to complete the look. A well-placed runner, sconces, or a mirror can make panelling stand out. Trim details and color choices can turn a basic design into a polished feature. Start small if you’re unsure—try a single wall or a lower-wainscot treatment. You can always expand later. That approach helps you test the style and fit before committing to a full redo.
Also Read About Half Wall Panelling Ideas for Modern Homes That Feel Stylish and Timeless.

